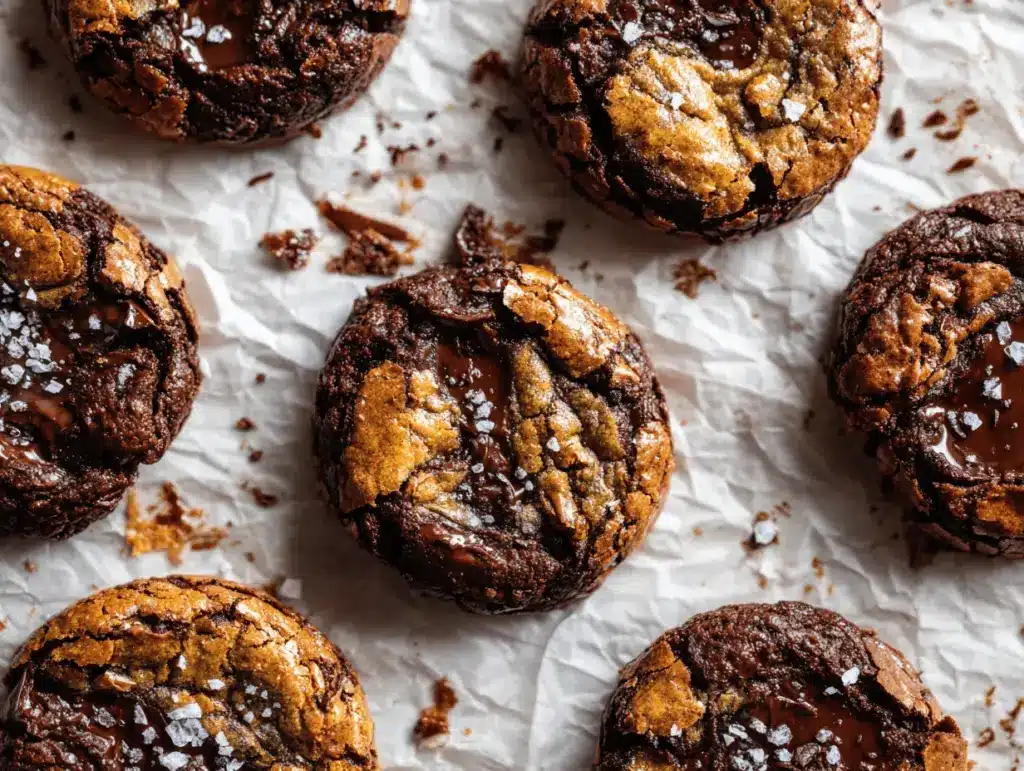
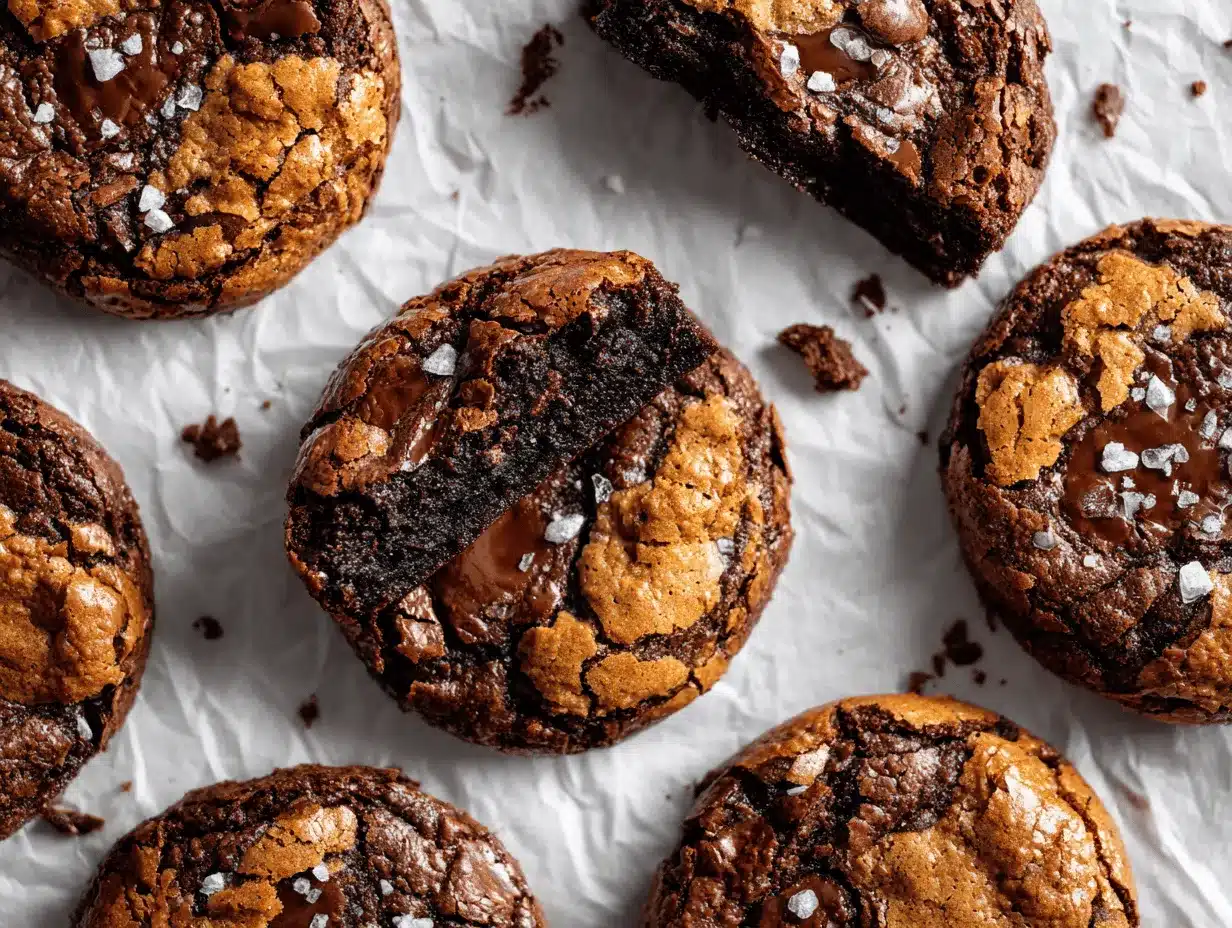
The first time I bit into a brookie, I swear I heard angels sing—okay, maybe it was just my family cheering, but still! Imagine biting into a treat that’s part rich, fudgy brownie and part chewy, buttery chocolate chip cookie. That’s what this brookies recipe is all about. The smell alone—warm chocolate, brown sugar, and a hint of vanilla—fills your kitchen with pure happiness. I started making brookies one rainy afternoon when I couldn’t decide between brownies or cookies (classic indecisive baker problems, right?). Now, these fudgy chewy brookies have become a go-to for birthdays, bake sales, and those days when you just need something epic with your coffee. They’re the best of both worlds, and honestly, I haven’t met anyone who can resist them.
Years of tweaking have led me to this version, and let’s just say, it’s dangerously good. If you’re looking for a dessert that can win over even the pickiest eaters, this is the one. Whether you’re baking for a crowd, sneaking a midnight snack, or sending treats to school, this brookies recipe delivers every time. Plus, it’s surprisingly simple—no need for fancy equipment or hard-to-find ingredients. I’ve made these with my kids, with my friends, and even solo at midnight (no shame!). Each time, they come out with that perfect crackly top and gooey center, with a cookie layer that’s just the right amount of chewy. Trust me, after making these, you’ll never want to choose between brownies and cookies again!
Why You’ll Love This Brookies Recipe
Having baked more batches than I can count, I can promise you—this brookies recipe is next level. Whether you’re a seasoned baker or just starting out, there are so many reasons these fudgy chewy brookie bars are a must-bake:
- Quick & Easy: Both layers come together in under an hour (including baking time!). Perfect for spontaneous dessert cravings or last-minute guests.
- Simple Ingredients: Pantry staples like flour, cocoa, chocolate chips, and butter—no need to hunt for specialty items.
- Perfect for Any Occasion: These brookies are a hit at potlucks, birthday parties, holiday gatherings, or just a cozy family movie night.
- Crowd-Pleaser: Can’t choose between brownies and cookies? You don’t have to! Everyone gets their favorite in every bite.
- Unbelievably Delicious: The contrast between the dense, fudgy brownie base and the soft, chewy cookie top is pure joy. The flavors melt together but still keep their own personalities—think of it as a dessert duet!
What really sets this brookies recipe apart is the texture. I use a secret trick (chilling the dough and underbaking just a touch) that gives you a gooey center with chewy edges—never dry or cakey. And if you’re like me and obsessed with that shiny, crackly brownie top, you’ll be happy to hear it makes an appearance here too.
Another thing I love: this recipe is super forgiving. Messed up the order? Forgot to soften your butter? Don’t panic. I’ve made every mistake and still ended up with a batch that vanished in minutes. That’s the magic of brookies—they’re always a win. They also freeze well, so you can stash a few for future you (trust me, you’ll thank yourself!).
Honestly, the best part is seeing everyone’s face when you reveal the brookies—there’s this moment of “wait, what is that?” followed by pure delight. It’s comfort food, but with a fun twist. You’ll find yourself making these over and over, and nobody will ever complain.
What Ingredients You Will Need
This brookies recipe keeps things straightforward—every ingredient works double duty to create that signature fudgy, chewy bite. Most of these are probably already in your kitchen. Here’s what you’ll need:
- For the Brownie Layer:
- 1/2 cup (115g) unsalted butter, melted (adds richness and fudgy texture)
- 1 cup (200g) granulated sugar (for that signature shiny top)
- 2 large eggs, room temperature
- 1 tsp vanilla extract (real vanilla makes a difference!)
- 1/3 cup (40g) unsweetened cocoa powder (Dutch-process or natural—either works)
- 1/2 cup (65g) all-purpose flour
- 1/4 tsp salt
- 1/2 cup (90g) semi-sweet chocolate chips (for melty chocolate pockets)
- For the Cookie Layer:
- 1/2 cup (115g) unsalted butter, softened
- 1/2 cup (100g) brown sugar, packed (adds chewiness)
- 1/4 cup (50g) granulated sugar
- 1 large egg, room temperature
- 1 tsp vanilla extract
- 1 1/4 cups (160g) all-purpose flour
- 1/2 tsp baking soda
- 1/4 tsp salt
- 3/4 cup (135g) semi-sweet or dark chocolate chips
Ingredient Notes & Substitutions:
- If you’re dairy-free, swap in vegan butter (I’ve used Earth Balance with great results).
- For gluten-free brookies, use a 1:1 all-purpose gluten-free flour blend. Bob’s Red Mill is my go-to.
- No chocolate chips? Chop up a good-quality chocolate bar instead (hello, pools of melty chocolate!).
- If you love nuts, throw in a handful of chopped walnuts or pecans to the brownie batter—it adds a nice crunch.
- Feeling adventurous? Mix in a few espresso powder granules to the brownie batter for extra depth.
When I want to go extra chocolatey, I’ll sprinkle a bit of flaky sea salt on top before baking. The sweet-salty combo is unreal. Don’t be afraid to make these your own!
Equipment Needed
One of the best things about this brookies recipe is how little equipment you actually need. You probably already have most of these tools:
- 8×8-inch (20×20 cm) square baking pan – This gives you perfectly thick brookies. If you only have a 9×9-inch pan, check for doneness a few minutes early.
- Parchment paper – Makes lifting out the brookies a breeze and prevents sticking.
- Mixing bowls – Two medium bowls, one for each batter. Glass or metal both work.
- Whisk and spatula – A whisk for the brownie layer, a spatula or wooden spoon for the cookie dough.
- Measuring cups and spoons – For accuracy. I use both US cups and a digital scale for the best results.
- Electric hand mixer or stand mixer (optional) – Makes creaming the cookie dough easier, but you can use a strong arm and a spoon if needed.
If you don’t have parchment paper, grease your pan well with butter or baking spray. I’ve tried both, and parchment is just less stressful when it comes to cleanup. For budget-friendly options, I’ve used dollar store mixing bowls and thrifted pans—brookies don’t need fancy tools, just love (and maybe a little patience with sticky dough!). If your baking pan is older, check for warping to avoid uneven baking—learned that one the hard way.
Preparation Method
- Preheat & Prep: Preheat your oven to 350°F (175°C). Line your 8×8-inch (20×20 cm) pan with parchment paper, letting it hang over the sides for easy lifting. Set aside.
-
Make the Brownie Layer:
- In a medium bowl, whisk together 1/2 cup (115g) melted butter and 1 cup (200g) granulated sugar until smooth (about 1 minute).
- Add 2 eggs and 1 tsp vanilla extract, whisking well until just combined. Don’t overmix, or the brownies can become cakey.
- Sift in 1/3 cup (40g) cocoa powder, 1/2 cup (65g) flour, and 1/4 tsp salt. Stir gently until just combined—no dry streaks!
- Fold in 1/2 cup (90g) chocolate chips. The batter will be thick and glossy.
- Spread this brownie batter evenly into your prepared pan, smoothing the top with your spatula.
-
Make the Cookie Layer:
- In another bowl, cream together 1/2 cup (115g) softened butter, 1/2 cup (100g) brown sugar, and 1/4 cup (50g) granulated sugar until light and fluffy (2–3 minutes with a mixer, longer by hand).
- Beat in 1 egg and 1 tsp vanilla extract until smooth.
- Add 1 1/4 cups (160g) flour, 1/2 tsp baking soda, and 1/4 tsp salt. Mix until just combined—don’t overwork!
- Fold in 3/4 cup (135g) chocolate chips.
- Layer the Cookie Dough: Drop spoonfuls of cookie dough over the brownie batter—don’t worry about covering every spot; the dough will spread as it bakes. Gently flatten the tops of the cookie dough mounds with damp fingers.
- Bake: Bake in the center of the oven for 28–32 minutes. The brookies are done when the cookie top is golden and set, and a toothpick inserted into the center comes out with a few moist crumbs (not wet batter). Ovens can vary, so start checking at 27 minutes.
- Cool: Cool in the pan on a wire rack for at least 30 minutes. (Trust me, they cut so much cleaner when cooled!) Use the parchment overhang to lift out the brookies.
- Slice & Enjoy: Cut into 16 squares. Serve warm for gooey chocolate or let them firm up for extra chewiness.
Troubleshooting Tips:
- If your brookies seem underdone, let them cool completely before slicing—they firm up as they set.
- If the cookie dough is hard to spread, chill it for 10 minutes, then use damp hands to gently press it down.
- For extra shiny tops, whisk the brownie sugar and eggs for an extra minute to dissolve the sugar well.
I often make these the night before an event and slice them the next morning—clean edges, perfect texture, and all the chocolatey goodness you could ever want!
Cooking Tips & Techniques
Baking brookies isn’t rocket science, but a few pro tricks make all the difference. Here’s what I’ve learned from dozens of batches (and a few “learning experiences” along the way):
- Room Temp Ingredients: Make sure your eggs and butter are at room temperature. It helps everything mix smoothly and evenly—no speckled batter or dense spots.
- Don’t Overmix: Especially with the cookie dough! Once you add the flour, mix just until combined. Overmixing leads to tough cookies and cakey brownies (not what we want).
- Watch the Bake Time: Every oven has its quirks. Start checking around the 28-minute mark. The center should be just set, and the top golden but not hard. Underbaking slightly means extra gooeyness, which is what makes these so irresistible.
- Cool Before Slicing: Yes, it’s hard to wait, but cutting too soon leads to a melty, gooey mess (unless you’re into that—no judgment!). For sharp squares, let them cool fully.
- Chilling the Dough: If your kitchen is warm, pop the cookie dough in the fridge for 10–15 minutes. It stops it from spreading too quickly, keeping the layers distinct.
I’ve definitely rushed the process and ended up with brookies that looked more like lava flows—still tasty, but not exactly Pinterest-worthy! If you’re multitasking, set a timer and check a few minutes early. I like to rotate the pan halfway through for even baking, especially if your oven has hot spots. Oh, and always use parchment paper—it’s a lifesaver for perfect edges and easy cleanup!
Variations & Adaptations
One of the joys of brookies is how easy they are to customize. Here are a few fun twists I’ve tried (and loved):
- Gluten-Free Brookies: Swap the flour for a 1:1 gluten-free blend. I’ve made these for a celiac friend, and nobody could tell the difference.
- Peanut Butter Brookies: Swirl 1/4 cup creamy peanut butter into the brownie layer before adding the cookie dough. The salty-sweet combo is unreal!
- Salted Caramel Brookies: Drizzle caramel sauce over the brownie batter, then sprinkle a pinch of flaky sea salt before baking. I did this for a holiday party, and they disappeared in minutes.
- Nutty Brookies: Mix in chopped walnuts, pecans, or almonds for crunch. About 1/2 cup in the brownie layer works well.
- Vegan Brookies: Use vegan butter, flax eggs (1 tbsp flaxseed meal + 2.5 tbsp water per egg), and dairy-free chocolate chips. The texture stays just as fudgy and chewy!
- Extra Chocolatey: Swap some chocolate chips for white chocolate or dark chocolate chunks in the cookie layer for a more decadent bite.
Honestly, my personal favorite is a s’mores version—add mini marshmallows and graham cracker bits to the cookie dough. The gooey, toasty result is pure bliss (and a bit messy, but so worth it!). There’s no wrong way to brookie—get creative and make them your own.
Serving & Storage Suggestions
Brookies are at their best slightly warm, with the chocolate still a little melty. Serve with a scoop of vanilla ice cream for ultimate decadence (my kids’ top request). For gatherings, stack them on a pretty plate or cake stand—they look gorgeous with their swirled layers. A sprinkle of powdered sugar or a drizzle of chocolate sauce ups the wow factor.
Storage: Once cooled, store brookies in an airtight container at room temperature for up to 4 days. If you want them ultra-chewy, add a slice of bread to the container—it keeps them soft (old bakery trick!). For longer storage, freeze individual squares for up to 2 months. Thaw at room temp or microwave for 10–15 seconds for that fresh-baked gooeyness.
Flavors deepen overnight, so if you can resist, let them sit for a day. They get even fudgier! If you want to reheat a whole batch, pop them in a low oven (300°F/150°C) for 8–10 minutes to warm through without drying out.
Nutritional Information & Benefits
Each brookie square (based on 16 servings) contains approximately 210 calories, 10g fat, 27g carbs, and 2g protein. Not exactly “health food,” but hey, everyone deserves a treat! The real stars here are the dark chocolate and cocoa powder, which bring antioxidants and a hit of happiness.
This brookies recipe can easily be modified for different diets—use gluten-free flour or dairy-free swaps as needed. Just keep in mind potential allergens (wheat, dairy, eggs, and soy in some chocolate chips).
I’m a big believer in balance, and these brookies are all about joy. Share them, savor them, and don’t forget to lick the spoon (I always do!).
Conclusion
If you’ve ever stood in your kitchen torn between brownies and cookies, this brookies recipe is about to become your new favorite. It’s easy, reliable, and delivers that perfect fudgy-chewy bite every single time. Customize with your favorite add-ins, play with flavors, and make it your own—there’s no wrong way to brookie!
I love making these for family movie nights or gifting a batch to friends (they always ask for the recipe). The best part? Watching everyone’s faces light up when they realize they get both brownie and cookie in one square.
Give this brookies recipe a try, and let me know how it goes! Leave a comment, share your own twists, or tag me on social media with your creations. Here’s to more joy—and chocolate—in every bite!
FAQs
Can I double this brookies recipe for a larger crowd?
Absolutely! Just use a 9×13-inch (23×33 cm) pan and increase the baking time by 6–10 minutes. Keep an eye on the center for doneness.
Do I need to chill the dough before baking?
It’s not required, but chilling the cookie dough briefly (10–15 minutes) helps keep the layers defined, especially if your kitchen is warm.
How do I keep brookies from being dry?
Don’t overbake! Pull them out when the center is just set. They’ll continue cooking as they cool, resulting in extra fudgy, chewy brookies.
Can I use boxed brownie or cookie mix?
You can! Use your favorite boxed mixes for each layer and follow this same layering and baking method for a quick shortcut.
What’s the best way to slice brookies cleanly?
Let them cool completely, then use a sharp knife wiped clean between cuts. For extra clean edges, chill in the fridge before slicing—works like a charm!
Pin This Recipe!
Brookies Recipe: Best Fudgy Chewy Brownie Cookies for Dessert
- Total Time: 50-55 minutes
- Yield: 16 squares 1x
Description
This brookies recipe combines the best of both worlds: rich, fudgy brownies and chewy, buttery chocolate chip cookies in one irresistible dessert bar. Perfect for birthdays, bake sales, or whenever you can’t decide between brownies and cookies.
Ingredients
- For the Brownie Layer:
- 1/2 cup (115g) unsalted butter, melted
- 1 cup (200g) granulated sugar
- 2 large eggs, room temperature
- 1 tsp vanilla extract
- 1/3 cup (40g) unsweetened cocoa powder
- 1/2 cup (65g) all-purpose flour
- 1/4 tsp salt
- 1/2 cup (90g) semi-sweet chocolate chips
- For the Cookie Layer:
- 1/2 cup (115g) unsalted butter, softened
- 1/2 cup (100g) brown sugar, packed
- 1/4 cup (50g) granulated sugar
- 1 large egg, room temperature
- 1 tsp vanilla extract
- 1 1/4 cups (160g) all-purpose flour
- 1/2 tsp baking soda
- 1/4 tsp salt
- 3/4 cup (135g) semi-sweet or dark chocolate chips
Instructions
- Preheat your oven to 350°F (175°C). Line an 8×8-inch (20×20 cm) pan with parchment paper, letting it hang over the sides for easy lifting. Set aside.
- Make the Brownie Layer: In a medium bowl, whisk together 1/2 cup melted butter and 1 cup granulated sugar until smooth (about 1 minute). Add 2 eggs and 1 tsp vanilla extract, whisking well until just combined. Sift in 1/3 cup cocoa powder, 1/2 cup flour, and 1/4 tsp salt. Stir gently until just combined. Fold in 1/2 cup chocolate chips. Spread the brownie batter evenly into the prepared pan.
- Make the Cookie Layer: In another bowl, cream together 1/2 cup softened butter, 1/2 cup brown sugar, and 1/4 cup granulated sugar until light and fluffy (2–3 minutes with a mixer, longer by hand). Beat in 1 egg and 1 tsp vanilla extract until smooth. Add 1 1/4 cups flour, 1/2 tsp baking soda, and 1/4 tsp salt. Mix until just combined. Fold in 3/4 cup chocolate chips.
- Drop spoonfuls of cookie dough over the brownie batter. Gently flatten the tops of the cookie dough mounds with damp fingers.
- Bake in the center of the oven for 28–32 minutes. The brookies are done when the cookie top is golden and set, and a toothpick inserted into the center comes out with a few moist crumbs (not wet batter). Start checking at 27 minutes.
- Cool in the pan on a wire rack for at least 30 minutes. Use the parchment overhang to lift out the brookies.
- Cut into 16 squares. Serve warm for gooey chocolate or let them firm up for extra chewiness.
Notes
For extra gooey brookies, slightly underbake and let them cool completely before slicing. Chilling the cookie dough for 10–15 minutes helps keep the layers defined. Brookies freeze well for up to 2 months. For gluten-free or dairy-free versions, use appropriate substitutes. Add nuts, caramel, or peanut butter for fun variations.
- Prep Time: 20 minutes
- Cook Time: 28-32 minutes
- Category: Dessert
- Cuisine: American
Nutrition
- Serving Size: 1 square (1/16 of pan)
- Calories: 210
- Sugar: 18
- Sodium: 90
- Fat: 10
- Saturated Fat: 6
- Carbohydrates: 27
- Fiber: 1
- Protein: 2
Keywords: brookies, brownie cookies, dessert bars, fudgy, chewy, chocolate, easy dessert, bake sale, birthday, chocolate chip cookie, brownie, homemade